How to Enable or Disable Microsoft Hyper-V at Windows 10?
Hyper-V is built into Windows as an optional feature, there is no need to download Hyper-V. Hyper-V can be enabled in many ways including using the Windows 10 control panel, PowerShell or using the Deployment Imaging Servicing and Management tool (DISM).
Requirements
-
Windows 10 Enterprise, Pro, or Education
-
64-bit Processor with Second Level Address Translation (SLAT).
-
CPU support for VM Monitor Mode Extension (VT-c on Intel CPUs).
-
Minimum of 4 GB memory.
Enable Hyper-V using PowerShell
-
Click on Start

-
Search PowerShell
-
Right clicks on Windows PowerShell and click to Run as administrator
-
Run the following command
Enable-WindowsOptionalFeature -Online -FeatureName Microsoft-Hyper-V -All
-
It will ask you for restart, allow to restart using
Y
Disable Hyper-V using PowerShell
-
Click on Start
-
Search PowerShell
-
Right clicks on Windows PowerShell and click to Run as administrator
-
Run the following command
Disable-WindowsOptionalFeature -Online -FeatureName Microsoft-Hyper-V-HypervisorEnable Hyper-V with CMD and DISM
-
Click on Start
-
Search cmd
-
Right clicks on Command Prompt and click to Run as administrator
-
Run the following command
DISM /Online /Enable-Feature /All /FeatureName:Microsoft-Hyper-V-
It will ask you for restart, allow to restart using
Y
Disable Hyper-V with CMD and DISM
-
Click on Start
-
Search cmd
-
Right clicks on Command Prompt and click to Run as administrator
-
Run the following command
DISM /Online /Disable-Feature:Microsoft-Hyper-V-
It will ask you for restart, allow to restart using
Y
Enable the Hyper-V role through Settings
-
Right click on the Windows button and select Apps and Features.

-
Select Programs and Features on the right under related settings.
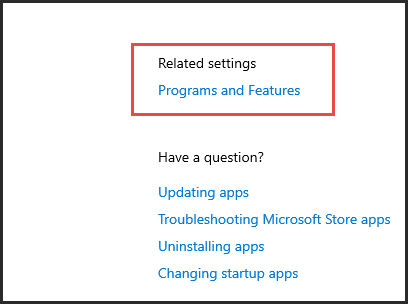
-
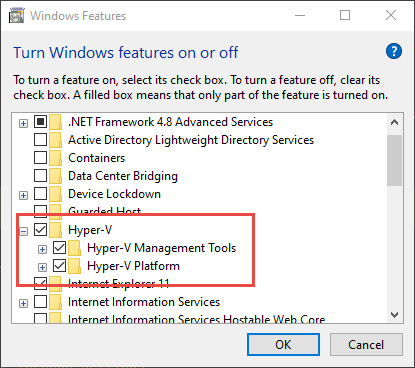
Select Turn Windows Features on or off on the left panel.
-
Check all the Hyper-V Items and click OK.
Disable the Hyper-V role through Settings
-
Right click on the Windows button and select Apps and Features.
-
Select Programs and Features on the right under related settings.
-
Select Turn Windows Features on or off on the left panel.
-
Uncheck all the Hyper-V Items and click OK.